Showing posts with label Adobe. Show all posts

Wednesday, June 8, 2011

DMA101 - Sports Logo Blog

I did a sports logo for a project with an industry tool, aptly named Adobe Illustrator.  In choosing a logo from a Lacrosse team, the San Jose Stealth, I was challenged with the Pen Tool.  Using the tool was not the challenge.  It is actually what to trace first and how to trace it.  The following is my experience.

First, I traced the target and which I thought was the easiest.  Then, the black background.  As you see there are no issues so far.


Next in line were the letters of the city and team name.  I thought that if I find a font that is close to the actual font family used, type the letters, and then convert the type to outlines and use the Direct Select tool to drag the lines to place.  This is an easy thing to do.  At least, I don't need to do any tracing.  However, it is a very, very tedious step.  Here's a screenshot of the letters for the city of San Jose.


On the next layer was the team's letters.  Unfortunately, I can't recall what the name for any of font family that were chosen.  It didn't matter, because I converted them to lines and aligned them to the reference.  Here's a screenshot of the aligned letters.  This step's tedious index was even higher than the City's letters.  The Team's name Stealth looks like it was chiselled and raised.  I couldn't find fonts that had something similar to it.  I had to trace each aspect that resembled a raised letters with the proper shades.  This tracing part prompted me to think if it was better to start the tracing of all the letters from the beginning and not waste time in searching for a font that closely resembles the actual font used.  Then I had to make sure that the traced "chiselled" and "raised" parts are on top when I filled the letters with the proper colour.   Another tedious process.


The lacrosse stick and the player seemed to have lesser tediousness and no issues as well.  Having said that, I was challenged this time with this logo.  The steps were minute and tedious and at the end, I respect the illustrators who are on this application all day.  In addition, noticing that my classmates are done and already have theirs printed and mounted, I kind of thought that I don't need to worry for this project was a piece of cake.  Unfortunately, I have underestimated that technology depends on having electrical power.  Tonight, there was a thunder storm.  There was a power failure that lasted about 20 minutes.  During those long 20 minutes, with the tiring repeated steps that are required, I became worried if I could complete this in time for submission.   After much worry, I finally completed the project.  Here's the final.


Saturday, May 28, 2011

Texturized Bug

The last thing I did to my bug painting was to make it into a texture background.  For this exercise, I used Photoshop CS5 once again.

First, I select all of the image, "Cmd-A" (Ctrl-A on PC) and copy, "Cmd-C" (Ctrl-C for PC users) and pasted it on a new layer.  On this layer, I desaturated it with keyboard combo "Shift-Cmd-U" and then select all and copy again.

Here I need to create a new Alpha Channel.  To do that, click on "/Filter/Render/Lighting Effects.../"

On the following screenshot, you will notice that there's a problem.  Don't worry, the menu items I mentioned are correct.  However, it doesn't show it on my version of Photoshop CS5.


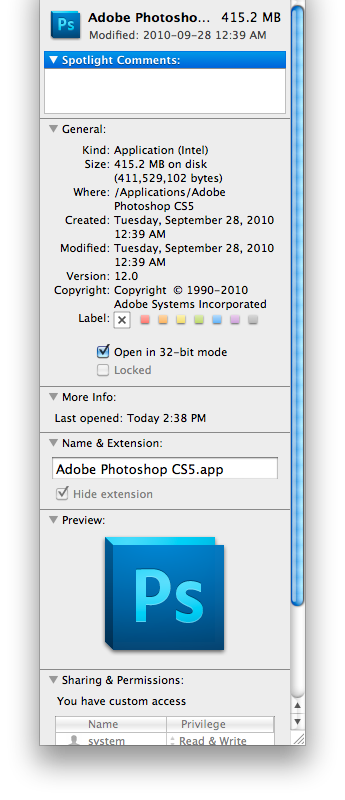
I never really used Photoshop beyond just manipulating the colours and highlighting and optimizing the image size prior to this.  So, I kinda got stuck.  It is strange that my copy of PS CS5 was missing a menu feature.  I asked and no one I asked had an answer.  I searched online for remedy and found out that the problem lies with PS CS5 runs on a 64 bit and that it must to switched to 32 bit to have that menu feature.  This to me is quite a surprise and I was very disappointed.  At first, I thought that it was not available on my Mac when it runs 64 bit.  However, I know that the PC's have been running 64 bit a while longer than the Mac.  The problem does not seem to be with the Mac after I found a solution online.  When I changed the setting on the Mac by going to the Application folder and right click the icon that launches PS, and checkmark "Open in 32-bit mode". 


The menu feature of Light Effects...showed up after I've made the change to run 32-bit for PS.  I guess no love from Adobe...thanks a lot!


Finally, back at the ranch, after clicking "Lighting Effects..." a window pops and here decide the settings according how you wish your texture will appear.  Just ensure that "Preview" is checked to see the changes immediately in the preview.


When you are satisfied how your image is textured, click "Ok", save , and enjoy you work!  Here's my version.


A New Brush

As I indicated in "Inventing Colour..." I also created a new brush.  I named it bug.  The following are the steps.

After I've created the following painting...


...and yes, once again, you could stop laughing now.

In Photoshop, I clicked "/Image/Adjustments/Desaturate" or Shift-CMD-U my Mac (Shift-CTRL-U on a PC) to desaturate or turn the image into black and white.

Then I selected the Lasso tool and after tracing/defining the part I believe would be a good looking brush, I clicked "/Edit/Define Brush Preset" and a menu window popped up and gave the new brush a name.  Clicked ok.


In "/Windows/Brush" or F5, I looked for the new brush I created to test it.  Now there's another brush to play with.

Friday, May 27, 2011

Inventing Colour...Swatches

I created some digital assets.  First is the colour swatch.  Painting is great way.  Using some paint, I used water colour paint.  Painted whatever...ok, it was a bug of some sort.  It sure doesn't look like one...and you could stop laughing at my very first set of unacceptable scary paintings.

The Bug of some scary sort...

I scanned these paintings and using Photoshop, I clicked the following: Image/Mode/Indexed Color and in the window menu, I chose 16 colours and for "Forced" I selected "Black & White" and clicked OK.  Then Image/Mode/Color Table and saved the new colour swatch.


Here's a screenshot and blow up version of the final colour swatch.