You know the largest tooth of the ocean...I got me one of them... Well, I made me one...sorta.
I did a little researching on the tooth of the biggest shark ever, that does not exist anymore, called Megalodon (means big tooth in Greek) and lived a long...really long time ago. It's length spanned to almost 20 meters...yes, that's meters...in length which is approximately 67 feet long.
So, I had the opportunity to make a replica of this. This is the first part. So far, I've already spent approximately 6 hours including research.
Prior to starting, I gathered some tools. This is my very first sculpting. With only have a block of Super Sculpey clay, I looked around the house to see what I could use to make sculpting tools. Found some paper clips, metal frame coat hanger, chopsticks, some ties which I collected to tie plants onto support poles...(I didn't know that these came in handy and I was unhappy when the toy manufacturers had to use unlimited ties to strap down a toy in the box it came with). Anyhow, I also had to build a support base to hold the model up. With some 2X4's lying in my garage, I used a few screws, to made a very simple but later found it not very sturdy and almost caused a fire...oops...don't tell me wifey... xD.
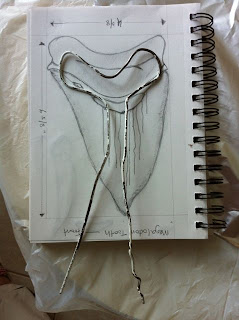
So, this is how I envision what the final product will look like. I planned for a length of 6 5/8" by 4 3/8 " wide. After some brief research and look at some photographs, I sketched the front, back, side, and top view briefly. I know my sketches are really scary and not artistic at all, but I'm not all that concerned. I just need something to model the replica as a reference. So, it'll have to do.
Next thing I did was to construct a tool to make the sculpting. I used 2 different sizes of paper clips and using the toy ties that I've been collecting, I wrapped it around the chopstick.
When the basic tool is constructed, I didn't want to take too much fresh aluminium foils to wrap the support frame. I just recycled newspaper, crumbled them, and wrapped it around the metal frame and shape it as close to the shaped I sketched.

Then I used about two sheets of approximately a little more than a foot each, wrapped the newspaper shaped tooth, and moulded it to look more like the tooth model I sketch and also to hold the newspaper crumbles in place.
At this point, I started to knit and gave the super sculpey clay a massage, flattened it, and wrapped it around the foiled model. When it was done, the model looked delicious and is ready for an oven. Does it not look like shwarma...hmmm...now I'm hungry. Sorry, I got carried away...but I'm still hungry.
 |
| The is the front |
 |
| The rear of the tooth |
After some moulding and making the tooth model smooth, it starts to look more in shape.
 When the tooth's surface was at an acceptable range, I preheated the oven to 130º C...which ended up being only 130º F instead and this also caused some problems as you will see really soon. Anyhow, I when the oven was ready, I placed the model into the oven and felt somewhat strange as 130º C does not feel very hot. While the model was inside the oven, I changed the setting to 275º F and then gave it a few more minutes to bake.
Do you see what the results were for using this 2X4? It seem this stud was stained and when I opened the oven door, smoke started to emerge from the bottom part of the stud that was resting on the bottom of the oven. Anyhow, a little excitement and adventure for my tooth modelling.
When the tooth clay model is hardened somewhat, I realized that I forgot to put in the crack that I had in the sketch I made. So, I quickly craved a crack on the base of the tooth. It didn't quite turn out as I wanted it to. Since this endeavour was without prior experience, I didn't know what to do. I could now mould more clay onto the base of the tooth and make the crack and then bake it again. However, the support base I used seemed to be stained, although it seemed somewhat pleasant, I don't want the house filled with the aroma of smoked wood studs. I will have to see if I could make it look better with paint.
On the back of the tooth's base, I poked some holes to give it pores. Now the next part is going to be painting it...don't know what to expect from that part now. I hope I don't spill paint all over the place.
Part 2 of this is coming up...access it here.


No comments:
Post a Comment